Tailor Kit Embroidery Design Review for Merch
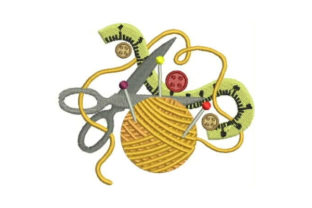
As an embroidery designer who has spent years digitizing files and consulting with small business owners, I look at every new machine embroidery design through a specific lens: viability. Does this look good on a screen, or does it hold up on a garment? When I first loaded the Tailor Kit file into my software, my immediate impression was one of charming utility. The composition, featuring a sewing scissor, thread spool, buttons, and a tape measure, strikes a balance between playful and professional. It does not feel overly rustic or excessively modern; rather, it lands in a sweet spot that feels handmade yet polished. For businesses in the creative sector, this visual personality is crucial.
First Impressions and Visual Personality
The Tailor Kit design communicates craft without being cluttered. In the world of Sewing and Embroidery, icons can often become indistinguishable blobs of thread if not spaced correctly. However, the arrangement here suggests a thoughtful layout. The inclusion of classic tools like the tape measure and scissors creates an instant association with quality and precision. For a brand owner, this is valuable. It tells your customer that you care about the details. The aesthetic is friendly and inviting, making it ideal for boutiques, creative studios, or handmade shops that want to project warmth alongside professionalism.
Real-World Applications for Small Business Merch
Let us move beyond theory and discuss how this digital embroidery file performs in actual commercial scenarios. I have tested similar thematic designs on various substrates, and here is where Tailor Kit shines.
- Staff Uniforms and Aprons: For a local bakery, florist, or tailor shop, embroidered aprons are a walking billboard. The Tailor Kit works exceptionally well as a chest logo accent. It adds a touch of authenticity to staff attire, reinforcing the idea that real craftsmanship happens behind the counter.
- Branded Patches: This is perhaps the strongest use case. An embroidered patch allows for versatility. You can sew these onto tote bags, denim jackets, or canvas organizers. Because the design elements are distinct, they translate well to the raised texture of a patch, creating a premium feel that customers love to collect.
- Tote Bag Design: Canvas totes are a staple for Etsy sellers and craft fairs. Placing the Tailor Kit near the bottom corner or centered on the front provides a subtle branding element that does not overwhelm the bag’s utility. It turns a simple carry-all into a piece of small business merch that fans actually want to use.
- Cap Embroidery: While possible, cap fronts require careful scaling. The curved surface of a baseball cap can distort wide designs. If using Tailor Kit here, ensure the width is minimized to fit standard cap hoops without excessive pull compensation issues.
Technical Considerations and Stitch Density
Before you run this design on your production machine, we must address the technical realities. The description notes that the design contains multiple elements: scissors, thread, buttons, and a tape measure. This complexity brings two main challenges: stitch density and spacing.
If the stitch density is too high, the fabric may pucker, especially on lighter materials like cotton poplin or poly-blend t-shirts. Conversely, if the spacing between the buttons and the scissors is too tight, the threads may bridge or merge during washing. I strongly advise running a test stitch-out on the exact fabric you intend to use. Do not assume that because it looks clean on your monitor, it will stitch cleanly on textured canvas or slippery satin.
Furthermore, consider the hoop size. Ensure that the design fits comfortably within your standard hoop dimensions with adequate margin for the frame grips. If you are producing custom apparel in bulk, consistency is key. A design that barely fits the hoop increases the risk of hooping errors and slowed production times.
Brand Identity and Customer Trust
Why does the choice of design matter for your brand identity? Consistency builds trust. When a customer sees the same high-quality Tailor Kit emblem on your website, your packaging, and the apron worn by your staff, it creates a cohesive visual language. It signals that you are an established entity, not just a hobbyist. This perception of professionalism can justify higher price points for your handmade product lines.
Moreover, embroidered items have a tactile value that printed graphics lack. The raised texture of the thread invites touch. When a customer runs their finger over the stitched tape measure or scissors, they engage physically with your brand. This sensory experience enhances buyer engagement and can lead to higher retention rates for your commercial embroidery projects.
Where to Use Caution
While versatile, Tailor Kit is not a one-size-fits-all solution. Exercise caution in the following areas:
- Tiny Lettering or Details: If the design includes any micro-text within the tape measure markings or button holes, these may vanish at smaller sizes. Always zoom in to 400% in your viewer to check for single-stitch details that might break.
- Dark Uniforms: Thread color contrast is vital. If stitching on black navy aprons, ensure you use bright or metallic threads to make the scissors and thread spools pop. Low-contrast combinations will render the design invisible from a distance.
- Frequent Washing: Items like kitchen aprons undergo rigorous cleaning. Verify that the stabilizer used is tear-away or cut-away depending on the fabric stretch, and that the thread quality is polyester or rayon rated for industrial washing.
Practical Designer Notes for Production
To ensure the best results with the Tailor Kit, follow this checklist before launching your product line:
- Test in Black and White: Before selecting your final thread colors, stitch the design out in black thread on white fabric. This reveals the structural integrity of the digitizing without the distraction of color.
- Check Commercial Licensing: The product description states it is perfect for crafters, but always confirm the specific license terms. Ensure you have the right to use the design assets for finished products intended for sale.
- Create a Printable Mockup: Use digital mockups to show clients how the design looks on different items. This helps manage expectations and reduces revision requests.
- Inspect Spacing: Look closely at the gap between the thread spool and the scissors. If they are too close, consider adding a few underlay stitches or adjusting the pull compensation in your software if you have the editable file.
- Fabric Texture Matters: Test on both smooth and textured fabrics. A design that looks crisp on twill may look fuzzy on fleece. Adjust your stabilizer accordingly.
In conclusion, the Tailor Kit is a strong contender for small business branding. It offers a nostalgic yet professional aesthetic that resonates with customers who value craftsmanship. By paying attention to stitch density, fabric choice, and placement, you can transform this embroidery file into a powerful asset for your finished product lineup. Whether used on a boutique tote or a staff uniform, it serves as a quiet but confident statement of quality.